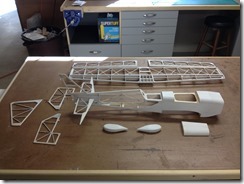
I finally ran out of excuses and started covering Stella today. She will be predominately white, with dark blue underneath, in front of the cockpit, and on the rudder/elevator. I’ll probably end up using a bit of red and blue trim judiciously applied to cover up mistakes (of which there will be plenty!). Here’s a shot of all the bones just prior to covering.
This is my second attempt at using film covering and my first time using Solite. My last covering job was done with Solarfilm, which is a bit heavier.
So far, I have gotten the dark blue on the rudder and elevator halves.
The Solite seems to be slightly easier to work with than the Solarfilm. It is so thin that you can spread it out and press down onto the surface and it will more-or-less lay flat and stay in place until you can tack it down. It shrinks easily and wrinkles seem to just disappear with the brief light touch of the trim iron. However, every little surface imperfection shows through and the surface “dents” very easily with the trim iron (no no sock). My regular iron (with a sock) is bit more forgiving in that regard. Also, I’m going through razor blades like crazy, Solite seem to shred and leave ragged cuts with anything but the sharpest blade.
Before starting in on the fuselage, I knocked together a quick and dirty stand out of 1/2” PVC pipe. Total investment of about 15 minutes time and under $10 worth of materials. This has been on my list for some time, but really is a must have to work on the fuse with the horizontal and vertical stabilizers attached.
I also started in on the white sections and have the horizontal and vertical stabilizers done, and one half of the fuselage.
As I feared, the Solite white is all but completely transparent, so even though I am paying a weight penalty, I am glad that I sprayed the model white before covering. In fact, after seeing just how transparent the white was, I touched up all the dark laser burn marks (which were still showing through the paint) with a bit of white acrylic paint. I only needed a few small drops, so the added weight from this step is truly negligible at this point.
I have shrunk the covering on the stabs and the front half of the fuse (i.e.; the fully sheeted section), but will wait until I have both sides covered before shrinking the open framework at the tail end.
Covering is definitely not my strong suit, but I feel like I am getting better at it. I’ll happy if I end up with a “C+” to “B” level job at the end.


